Wednesday, 7 May 2014

The Battle of the Trollshaws - Part 3 (Turn 3)

The previous post covered what happened in Turn's 1 & 2 of the Battle of the Trollshaws. Turn 3 of the battle continues below.


TURN 3

Angmar opened the third turn with its Command phase. The Shaman, having finally moved the Trolls and Wargs last turn, again signalled the Warg Chief (on a command roll of 5) to move within 1cm of the edge of the forest.

 
From that vantage point, the Wargs are able to see out of the forest, but still be protected from Rhudaur's cavalry.

 
Next the Shaman ordered, using very small words and speaking slowly and clearly in Black Speech (in other words with a command roll of 7), the Trolls forward onto Forest Hill.

 
The Shaman, now feeling please with himself for not botching his command rolls, looked over to the Cargul signalling that he was handing command back to the wraith. The Cargul looked back at the unit of Marauders that didn't budge last turn and ordered them forward. Passing his command check with a roll of 4, they move up to reinforce the western (left table side) edge of the battle-line.

 
Not wanting to move the battle-line forward into initiative range of Rhudaur's cavalry, the Cargul called an end to the Command phase. The wraith however was close enough now to Burrow Hill to attempt a risky strategy. Banking on Rhudaur not wanting to move too close to the Angmar battle line, exposing themselves to potential initiative movements by Angmar next turn, the Cargul headed off alone to Burrow Hill.

Command of the Angmar battle-line next turn would effectively rest with the Shaman. A risky strategy indeed, but one that may work. The Shaman looked hopefully at Forest Hill, knowing that the Trolls and Wargs would effectively be able to charge Rhudaur units in the flank if they approach the Angmar battle-line. Hopefully the Cargul would be able to raise some extra troops from the dead buried in those mounds. The Command phase for Angmar was now over.


The Angmar Shooting phase began with only the Cargul in a position to cast any spells. Amongst the burrows the wraith began its awful chant, calling forward fell spirits to do its bidding. The Rhudaur General looked toward Burrow Hill aghast as he realised what the wraith was attempting to do. The Cargul cast its vial spell on the Burrows. Amazingly it failed to call forth the dead to do its bidding.

The Shooting phase ended. With no Combat, that phase too ended and Angmar's turn is over.


Rhudaur now realises the threat posed by the Cargul on Burrow Hill.

Opening the Rhudaur Command phase, the Lord spurs on the Knights with a command roll of 4, moving them towards the Angmar line.

 
The Knights are now beyond 20cm and adjusting his command for the penalties of distance, second orders and enemy within 20 cm (the Wargs on Forest Hill), recognises that he will need a 5 or less to move them again. Taking a deep breath, the order goes out and he rolls a 4!

 
The Knights charge and hammer into Angmar's battle-line. The Shaman looks on with shock. He never expected such a bold move from Rhudaur.


The Lord, knowing the risk posed by the Wargs to the flank of his Knights (he can't see the Trolls because they are too deep into the forest), orders a unit of Spearmen on the eastern (right) flank of the Rhudaur line to move towards the Wargs. Rolling a 10 for his command check however means that the order gets lost in the clamour of the Knights charging off, and the Spearmen stay where they are.

The General now takes up command. Ordering the Scouts (with a command roll of 8) on to Burrow Hill, they quickly overrun the Cargul's position, forcing it to retreat to the nearest friendly unit. In this case, the nearest Angmar unit is the Marauders on the westernmost (left) flank. The Cargul is now attached to that unit until the end of Angmar's next command phase.


The General realises that he now has a golden opportunity to end this battle quickly by taking down the Angmar General, which is now attached to a unit of Marauder Cavalry. He quickly orders forward the Retainer cavalry to join the Knights assaulting Angmar's battle-line. Passing his command roll with a 5, the Retainers serge forward.


The Retainers close in on the Angmar line. The General now needs them to charge the Marauders and Warband on the western (left side of the table) flank. However there is now a -2 penalty to command checks due to a second order being given and having enemy within 20cm of the Retainers. The General rolls his command check and rolls another 5. LEGEND !!!

The Retainers charge forward, crashing in to the western flank of the Angmar battle-line.

 
With Angmar now hard pressed, the General orders the main Rhudaur battle-line of Spearmen (except for the unit the Lord attempted to move before) to move forward. Rolling an 11 for his command check however, he fails to push the Spearmen forward and the Rhudaur Command phase comes to an end.


No Rhudaur shooting units are within range of any Angmar targets, so the Shooting phase ends with no shots being fired.

The Combat phase now opened, with one major engagement taking place. As there were two charges, it was decided to simplify the calculations of the combat, and the subsequent combat dice rolls, by temporarily dividing the fighting between the units engaged by Rhudaur's Knights and those engaged by Rhudaur's Retainers.

Technically the whole melee should have been treated as one engagement, rolling masses of dice, but it was simpler this way. Once hits and armour saves where worked out, however, retreats would be determined as for the one big combat.

 
On the eastern (right) flank, the Knights crashed home scoring a whopping 20 hits against the Warband, who could only manage 8 hits in response.

One the western (left) flank, the Retainers only managed to score 4 hits against the Warband and 6 hits against the Marauders. In response, the Warband units opposed to the Retainers scored a total of only 2 hits. But the Marauders managed 8 hits in total, thanks in part to the Cargul's +1 bonus to one attack dice.

Once armour saves were determined, Rhudaur suffered a final tally of 14 hits to Angmar's 24 hits! A difference of 10 hits.

Dividing the 10 hits by Angmar's ten units involved in the combat meant that Angmar, the looser, was forced to retreat 1 cm.


Casualties were then removed. Angmar had lost two whole units of Warband on the eastern (right) flank, and still had 1 outstanding hit on another Warband unit. On the western (left) flank, one stand of Marauders had been lost, and 2 outstanding hits remained.

Rhudaur had lost 2 stands of Knights (no hits outstanding). The Retainers had also lost 2 stands, with the last stand having 2 outstanding hits on it.


The first of the casualties start to pile up (below).


As the victors, Rhudaur decided the following actions:
  • The Knights pursued the Warband
  • The 1 stand of Retainers with 2 outstanding hits on it, elected to fall back 14cm to recover hits
  • The other unit of Retainers pursued the Marauders

 
A second phase of combat was now fought.


The situation for Angmar was getting more desperate. Not only had they lost two units of Warband already, but being Warband, they suffer a -1 penalty when they are in retreat. In addition, one of the Warband units now had a unit of Knights on their flank after they pursued the Warband. The Knights and Retainers both gain a +1 bonus for their pursuit against Angmar.

On the eastern (right) flank, the Knights again smash the Warband scoring 21 hits to 3!
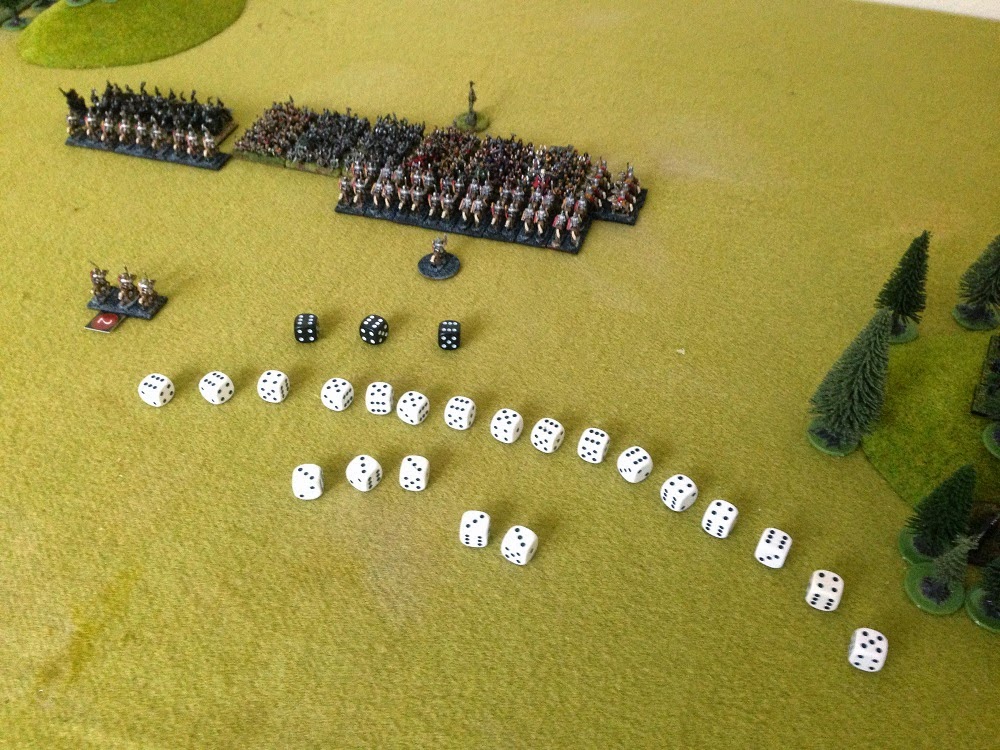

On the western (left) flank, the Retainers were up against Angmar's Marauders and Warband. The Retainers scored a total of 7 hits to Angmar's 9 hits.

 
Back on the eastern (right) flank, after armour saves where rolled, the Angmar Warband lost another two full units and a third unit had one outstanding hit remaining. On the western (left) flank, the Retainer unit suffered the loss of 2 stands leaving 1 stand left with one outstanding hit. Angmar's Marauders suffered the loss of 2 stands, having two outstanding hits on another stand.
 
The losses of stands and units finally began to mount up. The Knights pursued the retreating Warband...


...and the Marauders pushed back the Retainers.


This however was the end of the second pursuit combat. As such, the combat would now roll over into the next turn. Turn 3 now came to an end.


At the end of Turn 3, the casualties begin to pile up. Angmar has lost a total of 5 units, whilst Rhudaur hasn't lost any, but has 3 units down to 1 stand each.

Turn 4 is bound to be interesting!

Tuesday, 6 May 2014

The Battle of the Trollshaws - Part 2 (Turns 1 & 2)

As this will be the inaugural battle report for this blog, I am going to do a detailed report over several posts. Future battle reports are likely not to be so comprehensive.


The Battle of the Trollshaws - Part 1 outlined the setting and specific scenario rules for the battle. This blog covers the first two turns of the battle. The forces meeting in this battle are:

Angmar
  • Carn Dum Warband - 8 units (400 pts)
  • Ghostly Legion - 4 units (360 pts) - not starting on the table, must be summoned by the Cargul
  • Stone Trolls - 2 units (200 pts)
  • Carn Dum Marauders - 2 units (180 pts)
  • Wild Wargs - 1 unit (70 pts)
  • Warg Chief - Hero (70 pts) - permits +1 to Command checks with Wargs
  • Cargul - Leader (100 pts) - who is acting as the General for this battle
  • Sharman - Subordinate (90 pts)
Total points = 1,470 pts

Rhudaur
  • Spearmen - 4 units (180 pts)
  • Archers - 2 units (80 pts)
  • Rangers - 2 units (100 pts) - have the Ambushers house rule
  • Knights - 4 units (440 pts)
  • Retainers - 2 units (120 pts)
  • Scouts - 1 unit (60 pts)
  • General - General (100 pts)
  • Lord - Leader (80 pts)
Total points = 1,160 pts

Might house rule
The Might house rule is in effect in this battle. Each leader has a Might value (usually between 1 to 3 points). Might can be used at any time of the game, even in the opposite players turn. Might permits the leader to modify a single die roll by 1 point per point of Might. This can be used to modify command, shooting, spell or combat rolls, thus turning failures into success.

TURN 1

Angmar has the initiative as it is the invading force in this battle. As such, Angmar moves first in Turn 1. As it invades from the north, it also has the "northern" end of the battle field.

 
No units are in Initiative range and so the Shaman opens the Command phase of Angmars turn with trying to budge the Trolls and Wargs to the nearby wooded hill. His intent is to place them just inside the woods, where they wont be able to be attacked by the Rhudaur cavalry. The grand plan will be to use them to attack the flank of any Rhudaur units that attack the Angmar main battle line.

With a command of 8, and the presence of a Warg Chief (which grants a +1 to Command checks with Wargs) the Shaman fails miserably by rolling 11!

 
The Cargul gives the Shaman a stern kick in the rear and then orders out a brigade of Warband from the centre of the Angmar battle line. With a command of 9, the Cargul succeeds (just!) in the order.

 
 Out moves the first brigade of Warband and Angmar is off the starting block!

 
 Now to move the remaining Warband from the battle line.

 
 But the Cargul fails the command role, with a roll of 10.

 
Looking sheepishly at the Shaman, Angmar's Command phase comes to a swift end and its movement of its battle line to a grinding holt.

 
With no shooting units and both the Cargul and the Shaman not casting spells this turn, no Shooting phase occurs. Likewise, with no combat, the Combat phase is over. Angmar's turn is now complete.

Rhudaur now gets to have its go starting with its Command phase. No Rhudaur units are within Initiative range. The Lord, with a command of 8, opens Rhudaur's turn by rolling a 7 and moving the brigade of Knights out.

 
A second command roll (at -1 penalty) for the Knights brigade ends in a failure by one point (rolling an 8). The Lord, obviously not wanting to appear incompetent in the face of Angmar's command failures, expends a single point of Might (see Might house rule above) and modifies the 8 to a 7, moving the Knights forward a second time.

 
The Lord then rolls a 5 to move the brigade of Scouts and Retainers out from behind the Rhudaur battle line.

 
Now needing to roll a 7 for a second command to the Scouts/Retainers, the Lord promptly stuffs it again with his second order rolling another 8. Fumbling around in his saddle, he remembers that he has one point of Might left and so decides to use it to make the role a 7. The Scouts/Retainers move out...

 
...taking up with the Knights a striking position on Angmar's disorganised battle line.
 
Now its the General's go. He rises in the saddle and scans the field ahead.
 
 
The General considers repositioning the two units of Archers from the watchtower to a more advantageous position on the battle field. However, he decides instead to keep them in place to guard both the watchtower and their settlement.

 
Instead he orders one of the right-most units of Spearmen (on Rhudaur's eastern flank) to form a straight line with the rest of the spearmen. He has a command of 9 and passes his command test.

 
The Spearmen form a single battle line.

 
With the Command phase over, Rhudaur moves to its Shooting and Combat phases. However, there are no units within shooting distance and no units are in combat. So Rhudaur's turn is over and Turn 1 comes to an end. The battle field now looks like this.


TURN 2

Turn 2 begins with Angmar's Command phase again. The Cargul recognises the threat that now faces the Angmar battle-line. A brigade of Warband now stand isolated out front with Rhudaur's cavalry within striking distance of them this turn. The Cargul looks at the Shaman with menace, he better not screw things up this time!

 
Feeling undead eye's burning the back of his head, he rolls a 6 and gets both the Trolls and Wargs moving finally.

 
They head for the wooded hill. Warg's are cavalry and reach the top of the hill easily. Normally cavalry cannot entre wooded/forested areas however Wargs are Pathfinders permitting them to entre wooded areas, so they head on to the hill receiving protection from any Rhudaur cavalry charge. The slower Troll units however are still on the plane behind them.

 
The Shaman smugly looks back at the Cargul. "Your go wraith," he mutters under his breath. The Cargul glares at the remaining Warband and (rolling a 7) they move forward reforming the Angmar battle line.

 
Now the for Marauders. The Cargul calls them forward but rolls an 11. Damned fools! The cavalry have now left the Warband's western (left) flank open to Rhudaur's cavalry. Angmar's Command phase is over and the Shooting phase begins.
 
 
With no shooting units, and the Warband having its left flank exposed, the Cargul casts the spell Faster You Dogs on one of the Marauder cavalry units. They surge forward to take up position on the Warband's western flank.

 
The Shaman then attempts the same for the other unit of Marauders and fails. The Cargul glares at the Shaman, "Not so good a magic user as you thought you were, Shaman," it hisses in its wraith voice.

The Cargul spies Burrow Hill. If it can only get there, it may be able to raise up to four units of Ghostly Warriors. If it can, it will put significant pressure on Rhudaur.

 
Rhudaur however is closing in on Burrow Hill, potentially shutting down the Cargul's chance to raise a host of the dead.

 
Rhudaur now have their turn. Spying the Angmar line, their Warband are no longer exposed. The opportunity to easily take out a brigade of Warband has been lost.

 
Sensing the Carguls desire to get to Burrow Hill, the Lord opens Rhudaur's Command turn with moving the Scouts/Retainers over towards the hill.

 
They take up position at the base of Burrow Hill and eye the oncoming Angmar battle line. The General then takes command and (on a roll of 3) motivates the Spearmen forward to back up the Rhudaur cavalry.

 
Bellowing, the General orders "At all costs, that Cargul must be kept away from those ancient tombs on Burrow Hill!" Suitably motivated (with a command roll of 6), the Spearmen surge forward a second time.

 
Now the Rhudaur line is in a strong position to deny Angmar the chance to control Burrow Hill and call forward the dead from the ancient burrows.

 
Rhudaur's western flank is ready to take Burrow Hill, should Angmar threaten to move on to it.

 
Rhudaurs eastern flank is protected by the Knights.

 
The Rhudaur Command phase now over, the final disposition of both forces has Rhudaur arguably in the better position.

 
Rhudaur now shifts to its Shooting phase. With no shooting units within range, the Shooting phase ends without an arrow being shot in anger.

 
The archers watch the unfolding fight safe within the walls of the watch-tower.

 
Everyone takes a deep breath. Turn 3 will likely see bloodshed.