Sunday, 27 March 2016

Warmaster Tomb Kings Hierotitan

I've begun a process of revamping my Warmaster Tomb Kings army. No small feat and one of many projects I start and then end up doing piecemeal between a bunch of other projects. More on this project in the coming months!


Anyway, back at MOAB last October I picked up the Reaper Miniatures Avatar of Sokar from Reapers Bones range (ie plastic version, not the metal one), and over this Easter break I decided to paint it up. I though that this mini would make an excellent Tomb Kinds Hierotitan for my Warmaster army.


This bad boy is based on a 40x40mm base due to the base the plastic miniature is bound too. It towers menacingly over the battlefield and looks suitably nasty and bound to intimidate those puny 10mm figures.
Run, puny ones...RUUUNNNNN!!!!

I'm telling you lads, the fish was this big.. honest...

To paint it, I used the following method.
  • Basecoat in Chaos Black
  • Paint 'lightning style' flecks on the stone skin with Shadow Grey (i.e. a blue grey colour).
  • Highlight these flecks with Space Wolves Grey (i.e. light blue grey colour).
See below for example of what I mean by 'lightning style' flecks

'lightning style' flecks over the stone skin of the miniature

  • Next paint the robe cloth in Pallid Wych Flesh.
  • Highlight the cloth with White Scar
  • Paint leg bands, arm bands belt and base of rob, chest piece and headband in Sycorax Bronze
  • Paint cod-piece in Shinning Gold.
  • Paint the head dress in the same way as for the robe (Pallid Wych Flesh, then highlight in White Scar).
  • Paint the mace in Sycorax Bronze.

  •  Highlight metal in Shining Gold and Chainmail as you desire (see for example the cod piece and the mace below)
  • Paint the detail on the necklace with an alternate blue, red, green arrangement. Got this idea from a fantastic paint job done for the metal version of this miniature on the Reaper website.
  • I used Teclis Blue base highlighted by Temple Guard Blue for the blue colour,
  • Mephiston Red base highlighted by Evil Sunz Scarlet for the red colour, and
  • Warpstone Glow base highlighted by Goblin Green (Snott Green?) for the green colour.
  • The base edge I painted in Rakarth Flesh and then just used sand from my local beach to cover the base.


  •  I highlighted the eye guards with Chainmail as well.

I was tempted to wash the miniature in either black or brown wash but decided against it as I thought it would drown out the colours.

I want to do another one of these for my 1/72 Kings of War project. However I think I will buy the metal version of this miniature for that project as their is a lot of detail that only faintly can be seen in the plastic version. The metal version keeps those details and so can makes this lad a real centre piece for an army.


Hope you are having a blessed, safe and wonderful Easter!

Friday, 25 March 2016

Hope you have a blessed and wonderful Easter. And don't eat too many chocolate eggs!


Isaiah 53 New International Version (NIV)

Who has believed our message
    and to whom has the arm of the Lord been revealed?
2 He grew up before him like a tender shoot,
    and like a root out of dry ground.
He had no beauty or majesty to attract us to him,
    nothing in his appearance that we should desire him.
3 He was despised and rejected by mankind,
    a man of suffering, and familiar with pain.
Like one from whom people hide their faces
    he was despised, and we held him in low esteem.
4 Surely he took up our pain
    and bore our suffering,
yet we considered him punished by God,
    stricken by him, and afflicted.
5 But he was pierced for our transgressions,
    he was crushed for our iniquities;
the punishment that brought us peace was on him,
    and by his wounds we are healed.
6 We all, like sheep, have gone astray,
    each of us has turned to our own way;
and the Lord has laid on him
    the iniquity of us all.
7 He was oppressed and afflicted,
    yet he did not open his mouth;
he was led like a lamb to the slaughter,
    and as a sheep before its shearers is silent,
    so he did not open his mouth.
8 By oppression and judgment he was taken away.
    Yet who of his generation protested?
For he was cut off from the land of the living;
    for the transgression of my people he was punished.
9 He was assigned a grave with the wicked,
    and with the rich in his death,
though he had done no violence,
    nor was any deceit in his mouth.
10 Yet it was the Lord’s will to crush him and cause him to suffer,
    and though the Lord makes his life an offering for sin,
he will see his offspring and prolong his days,
    and the will of the Lord will prosper in his hand.
11 After he has suffered,
    he will see the light of life and be satisfied;
by his knowledge my righteous servant will justify many,
    and he will bear their iniquities.
12 Therefore I will give him a portion among the great,
    and he will divide the spoils with the strong,
because he poured out his life unto death,
    and was numbered with the transgressors.
For he bore the sin of many,
    and made intercession for the transgressors.

Sunday, 13 March 2016

Stonehenge Terrain for Warmaster


I bought some years back a miniature replica of Stonehenge from Amazon. My desire at the time was to make some varied terrain for Warmaster. You can find the same one at this link here, called 'Build Your Own Stonehenge (Mega Mini Kit)'.

I hadn't gotten around to mounting it or painting it up the way I wanted to until around Christmas time. I was in Bunnings and was passing through their small craft section to get something else when I noticed that they had mounting boards. Looking at one, I thought that it would be a good base for that old Stonehenge kit I never finished and so bought one to use.

The process was fairly simple, though a little time consuming. So it sat as a side project over Christmas as I began work on my Christmas/North Pole Army.

First, I used Teslers Glue to set the Menhirs in the positions I wanted to place them. Teslers is a slow drying but solid glue and gave me flexibility to move the stones around slightly as I wanted.


Once the standing stones were set, I used PVA glue to affix some white pebbles that I also got as "offcuts" from Bunnings as well.


Once this was dry, I then slowly worked my way around the base with PVA glue once again, this time covering about 1/3 of the base at a time. Once I had glued everywhere I wanted to at that stage, I used beach sand to cover the base. I repeated the process and last of all made sure that the sides of the base was also fully covered with sand.


I then base sprayed the entire model in a Dark Brown spray. I then painted each menhir with a wetbrush of Shadow Grey (which is a blue/grey paint). Once these had dried, I then applied a drybrush of a lighter grey (Codex Grey if memory serves me correctly).


I then applied PVA glue to the base of about 1/3 of the model and applied a variety of flock. I was careful to leave some areas with no PVA so as to appear as an area more well trodden that other areas.


This process was repeated until I had covered the entire base as desired.


One helpful tip in doing this is that between PVA applications, I rested the base on an upturned container or even a spray can lid at times. This meant that the base was elevated just in case PVA dripped from the base itself. I also had paper towel under the container/spray can lid to also catch any dripping PVA. This kept my workspace clean and also prevented the base from sticking to my work table.

 
One the battlefield, this would act as Defended Terrain that could be upgraded to Fortified Terrain with the addition of field works across access points.
 
The size of the menhirs can be seen against the Kallistra Norman Command piece below.


Wednesday, 2 March 2016

Ral Partha and Iron Wind Metals announces that they will be launching Chaos Wars 2nd Kickstarter

I had a heads up on this one after having some email contact with Iron Wind Metals a few months back (see here). But Ral Partha and Iron Wind Metals have announced their intentions to run a second and more comprehensive Chaos Wars Kickstarter Wave 2. See the link below for more details.

KickStarter Wave 2 Announcement


We are very happy to share the news that our plans for the second kickstarter have grown to not only re-release many classic Ral Partha Dwarves, Troglodytes, and Undead; but will also include the release of several previously unreleased miniatures, and many completely new and unique sculpts.

Saturday, 13 February 2016

Half-trolls of Harad for Warmaster (10mm)


I wanted to make some Half-trolls for my growing Haradrim army. Casting my eye around my usual favourite stockists of fine miniatures, I came across these from Splintered Light miniatures.


They are Savage Orcs and looked the part for what I was after.


There are only three different poses, but with some creative placement, they look pretty good.


The first unit was painted up fairly quickly. I used a wetbrush of Rakarth Flesh over a black basecoat (you could also achieve this with a very heavy drybrush of the same). The hair was painted in a grey, the wood in dark brown, the loincloths in a lighter brown and the axe heads in a light grey. The axe bindings were done in an off white colour.


My plan is to have a brigade of these blighters. So need to get some more from Splintered Light in the near future.

Sunday, 7 February 2016

10mm Warmaster Mumak


Eureka Miniatures make an excellent proxie for the Harad Mumak. I purchased a few of these Eureka mini's a couple of years ago. However I had not got around to painting any of them until a few weeks back. So here is the first of my 10mm Mumak proxies complete with Old Glory Arab Spearmen and Archers added for crew.


I based this on a GW cavalry base and also swapped around the tusks from their normal positions (the larger tusk goes above the smaller one) in order to provide some variety between the miniatures.


The howdah I also positioned differently to the position its meant to hold on the miniature. This enabled a look more similar to the 28mm version of the GW War Mumak.


I opted for a simple paint job on the Old Glory spearmen and archers, but they were still detailed enough to look good.


One down, a stack to go!

Monday, 1 February 2016

Plague Drones of Nurgle for Warmaster (and other fantasy 10mm gaming)

"High-ranking Plaguebearers are known amongst the Daemon legions as Plague Drones, a title that conveys commendable humility. These overseers of Nurgle’s realm ride into realspace mounted upon Rot Flies – colossal daemonic insects whose appearance is so repugnant it scars the mind. (Games Workshop)"


During MOAB last October I came upon some new releases from Reaper Miniatures. These were products from their BONES I & II kickstarter campaigns. Amongst the lot of miniatures I purchased was the Fly Demon. I pick it up thinking that I could use it for something but wasn't sure at the time just what I wanted to use it for.

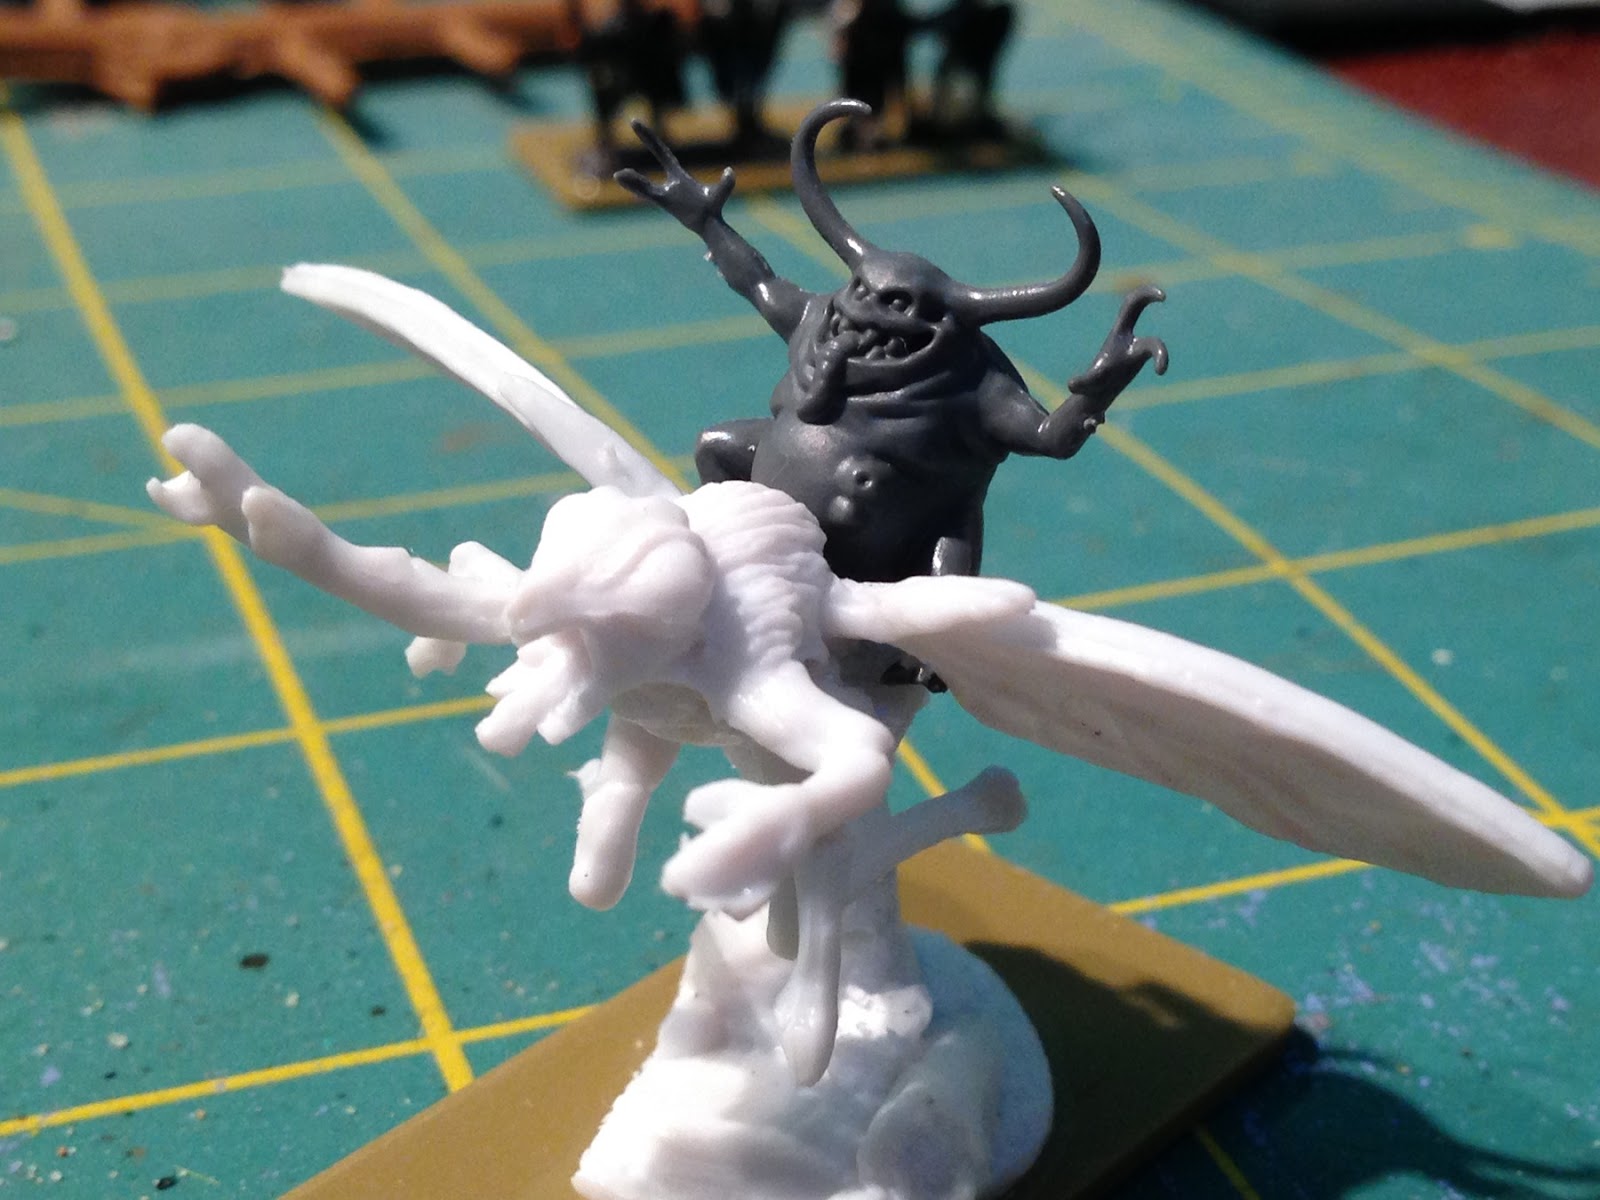
Anyway, it recently hit me that these could make good proxies for Rot Flies for Warmaster or other 10mm fantasy gaming.


Looking at the fly miniature, it can fit in nicely as a giant Rot Fly. All I would need was a rider for the filthy creature. That's when I remembered that I had a box of Nurglings. These little troublesome fellers are just the right size for 10-12mm wargaming.

So, to make one Plague Drone, take one Reaper Miniatures Fly Demon...


Add one Nurgling...


Glue it to the fly's back...


Add a cut up flag (this one came from the Kallistra miniatures Norman Command pack. I use paper flags for my troops, by the way) to make a wicked looking sword. Glue the sword to the Nurgling and VOILA! One Plague Drone of Nurgle. Now all I need to do is get more of those flies!