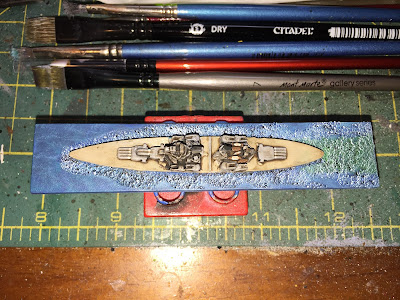
Davco 1/3000 Prince of Wales Battleship
A new month and a new project! This time, I have been bitten by the naval bug.
The idea or large fleets at sea engaged in all out battle has always been a wargaming avenue I have wanted to reenact on the gaming table. However until now I haven't had the chance to purse that part of our great hobby. Recently however I have been building up some WWII and Modern naval fleets and slowly painting them. Painting them has been fairly easy (but that's for another post). Basing them has proved more troublesome. So I thought I would share how I am currently going about this little problem.
The miniatures below are all 1/3000 scale Davco ships (
available here).
Firstly I base the ship on a long rectangular base. In the case above I have used a Renedra plastic 80mm x 40mm base. After fixing the ship miniature down on the base, I used PVA glue and sand to create the waves coming off the ship. This, once dry, gives the impression of the ship moving through the water. I then base coated the ship in Black Spray. Once dry I then painted the ship model. The final step was doing the base.
The paints I chose to colour the base can be seen above. From left to right they are in the order in which I painted the base.
I first use Dark Reaper grey (which has a slight bluish hue to it) painting in light wet brush strokes from front to back. In this way the paint flowed in a way in which the ship is heading and adds to the illusion of movement.
Next I used Caledor Sky blue. I painted this in the same manner as the previous step being careful to leave some areas of the Dark Reaper showing through. I also painted the sides of the base so that the entire base has a predominately blue tinge to it.
Next came Sotek Green. I dappled the front of the base with the brush in order to give the idea of natural wave action ahead of the ship plowing through the waters. Further back along the base I used the same front to back strokes being careful not to drown out the previous colours.
Next I applied Warpstone Glow to the wake of the ship. This will help to reflect the churned nature of the water directly in the wake of the ship due to the vessels screws chopping through the water.
I then applied Temple Guard Blue in very much the same process as I applied for the Sotek Green, i.e. stippling the front of the base and lightly brushing along the sides of the vessel in a front to back motion. I was careful not to cover the Warpstone Glow whilst doing this. The amount of paint on the brush was fairly light but not as little as you would use for dry brushing.
The final step was to use White Scar. This I applied over the sandy raised areas of the base as a dry brush. I covered over only the areas where the sand had been applied but made sure that I was present around the bow of the ship and the stern wake as well.
And that's it. A little length but give the size of the model and its base, it didn't take more than a hours work including waiting for the paint to dry.


