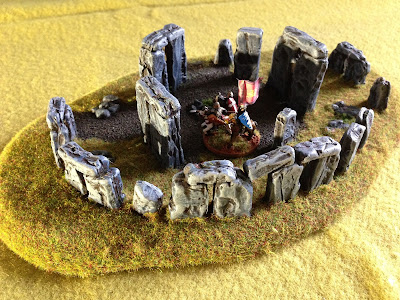
I bought some years back a miniature replica of Stonehenge from Amazon. My desire at the time was to make some varied terrain for Warmaster. You can find the same one at this link here, called 'Build Your Own Stonehenge (Mega Mini Kit)'.
I hadn't gotten around to mounting it or painting it up the way I wanted to until around Christmas time. I was in Bunnings and was passing through their small craft section to get something else when I noticed that they had mounting boards. Looking at one, I thought that it would be a good base for that old Stonehenge kit I never finished and so bought one to use.
The process was fairly simple, though a little time consuming. So it sat as a side project over Christmas as I began work on my Christmas/North Pole Army.
First, I used Teslers Glue to set the Menhirs in the positions I wanted to place them. Teslers is a slow drying but solid glue and gave me flexibility to move the stones around slightly as I wanted.
Once the standing stones were set, I used PVA glue to affix some white pebbles that I also got as "offcuts" from Bunnings as well.
Once this was dry, I then slowly worked my way around the base with PVA glue once again, this time covering about 1/3 of the base at a time. Once I had glued everywhere I wanted to at that stage, I used beach sand to cover the base. I repeated the process and last of all made sure that the sides of the base was also fully covered with sand.
I then base sprayed the entire model in a Dark Brown spray. I then painted each menhir with a wetbrush of Shadow Grey (which is a blue/grey paint). Once these had dried, I then applied a drybrush of a lighter grey (Codex Grey if memory serves me correctly).
I then applied PVA glue to the base of about 1/3 of the model and applied a variety of flock. I was careful to leave some areas with no PVA so as to appear as an area more well trodden that other areas.
This process was repeated until I had covered the entire base as desired.
One helpful tip in doing this is that between PVA applications, I rested the base on an upturned container or even a spray can lid at times. This meant that the base was elevated just in case PVA dripped from the base itself. I also had paper towel under the container/spray can lid to also catch any dripping PVA. This kept my workspace clean and also prevented the base from sticking to my work table.
One the battlefield, this would act as Defended Terrain that could be upgraded to Fortified Terrain with the addition of field works across access points.
The size of the menhirs can be seen against the Kallistra Norman Command piece below.


